Google rich snippets. What the heck are those?
They're these awesome things that can help you improve your website's SEO and generate more site traffic from search engine results pages (SERPs), and in this article, I'm going to tell you how to set them up.
Let me first pose a question to you: Have you noticed that when doing a Google search, certain listings just look a little sexier than others? For example, if you were doing a search for "apple pie," which of these listings when you rather click on?
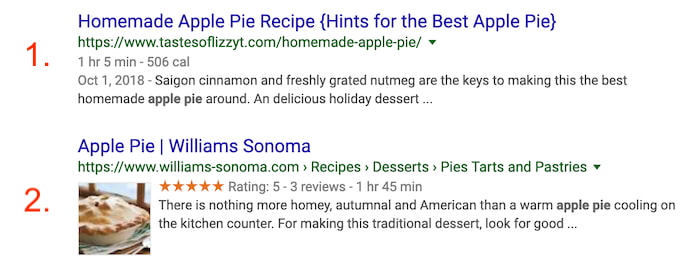
I'll bet you chose option #2. If you didn't, you must really not like apple pie.
Between the thumbnail image and the five-star rating scale, what are these sites doing to make their Google listings include this extra media? The secret to these fancy pieces of information are rich snippets, which these websites have optimized for using the HTML of their website pages.
Google Rich Snippets
Google rich snippets are enhanced search results that produce more details about a website than the average link. This "rich" media can include images, ratings, authors, dates, locations, and more. Publishers can give Google these details by including structured data in the backend of their webpages.
Google rich snippets -- also called "rich results" -- extract information from your website to display on your site's listing in the search results, in addition to the typical page title, page URL, and meta description.
Each search result is guaranteed to display these three pieces of information, making up an individual snippet. The thinking is, the more information included in a search result's snippet, the more likely users are to click on that result. With enough structured data on the page, you can earn a rich snippet.
Rich snippets are often overlooked in businesses' SEO strategies because they are more difficult to implement than traditional on-page SEO. But with how complex Google search results look today, it would be worth your while to spend a little time learning how to do this. Adding this content-rich information to your Google search listings draws the eye and can increase your listings' click-through rates, even when you're not ranking in the #1 position.
There are a few options for how to install rich snippets, but I'm going to show you the easiest method: using microdata.
Keep in mind this process won't guarantee that you'll get a rich snippet. But giving these details special treatment can dramatically increase your chances of enhancing the appearance of your search result -- and, in turn, the traffic you get from it.
How to Create Rich Snippets
- Identify which details you want Google to focus on.
- Define your webpage using Google's Structured Data Markup Helper.
- Create microdata for your webpage using your selected data type.
- Create new HTML from this microdata.
- Tag your content with this microdata.
- Test your rich snippet.
- Be patient.
1. Identify which details you want Google to focus on.
Your webpage's topic and format will dictate which types of information you want Google to display in its search results. Are you writing an article? An event page? A book review? A product page? Here are some examples of details included in rich snippets for the several types of snippets available to you:
- Article: You can add tags for the article title, author, meta description, publish date, featured image, and more.
- Restaurant pages: You can add tags for food items, item prices, item descriptions, item images, item calories, and more.
- Product page: You can add tags for product names, product ratings, product prices, product availability, product images, and more.
- Event page: You can add tags for the event name, event speakers, event schedule, event dates, and more.
- Recipe: You can add tags for recipe rating, ingredients, image of final product, cooking duration, total calories, and more.
2. Define your webpage using Google's Structured Data Markup Helper.
So, how do you create the tags listed above? Unfortunately, it's not as easy as writing "Here's the product's price" in your webpage's HTML and expecting Google to take the hint. To properly communicate this information to Google, the company offers a handy tool for creating structured datasets based on the type of webpage you're publishing. It's called the Structured Data Markup Helper. Use it here, and see it below.
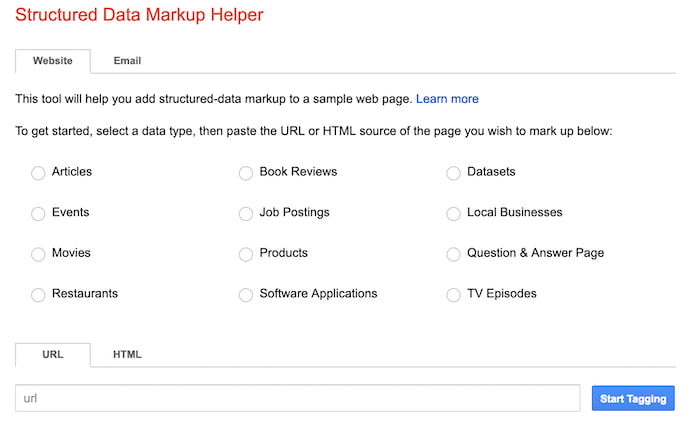
As you can see, above, you'll start by selecting the attribute that best describes the content you're creating. Then, at the bottom of this page, enter the existing URL of the webpage to which your content has been published. (Note: To use this tool, you'll publish your content first, and then retrieve the URL so you can structure your data accordingly.)
3. Create microdata for your webpage using your selected data type.
Microdata is a way to label content to describe what this content represents. An event, for example, has all sorts of information associated with it, including the venue, starting time, name, and category. You can then use a bit of code to basically tell Google, "Here's my event and the most important information people would need to know about it."
How Microdata Can Be Used
Microdata wraps your text in very simple HTML tags, such as <span> or <div> tags, to assign descriptive terms to each bit of information. Here's an example block of HTML showing some basic information about me -- the author of this article -- below.
<p>My name is Diana Urban, and I was born and raised in New York. I'm on the marketing team at HubSpot, an all-in-one marketing software company in Cambridge, MA.</p>
See those <p> tags at the beginning and end of the copy, above? This denotes text that is in standard paragraph style. There's nothing unique about the text above compared to any other paragraph in this article. This makes it hard for Google to interpret it the way you might want it to be interpreted.
Now, here is the same HTML tagged with microdata:
<div itemscope itemtype="https://ift.tt/18j3LkpPerson">
My name is <span itemprop="name">Diana Urban</span>, and I was born and raised in New York.
I'm the <span itemprop="title">Head of Prospect Marketing</span> at <span itemprop="affiliation">HubSpot</span>, an all-in-one marketing software company in Cambridge, MA.</div>
Those bold tags in the HTML above tell Google what each piece of my author bio actually is. The "person" tag indicates this is about a person. The "name" tag indicates the following text is my name. The "title" tag indicates the following text is my job title. The "div" tags single out the entire section of HTML so Google knows it can highlight it in my article's snippet, given the appropriate search term a user might enter.
Creating Your Microdata
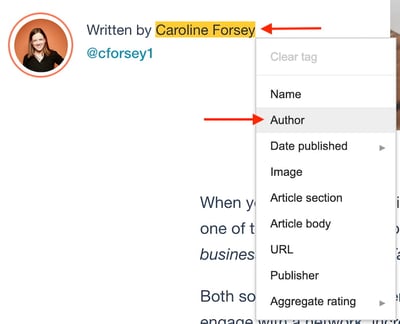
Once you've selected your data type in the previous step, you'll be taken to a page where you can automatically associate certain details of your webpage with microdata that describes those details. To create microdata for an article's author, for example, you'll highlight the author's name on the webpage -- which Google projects on the lefthand side of the tool -- and select "Author" in the dropdown that appears. See how this looks, below.
4. Create new HTML from this microdata.
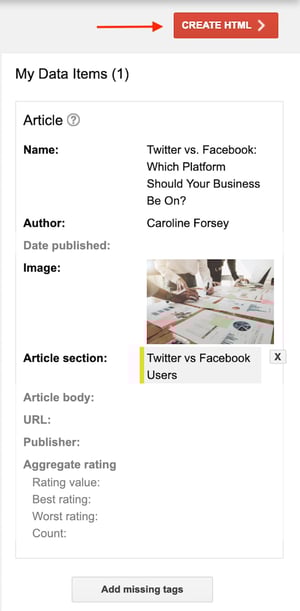
Next, you'll create new strings of HTML from the microdata you created in the previous step. Once you've finished assigning each part of your webpage a proper tag, click the red "Create HTML" button on the top-righthand corner of the tool, as shown below.
5. Tag your content with this microdata.
With your HTML successfully created, you'll see every tag you created in step 3, above, listed in a block of code you can then insert into your article's HTML. You'll insert this code in your content management system (CMS).
Google recommends adding the HTML it created for you into the "head section" of your article's HTML. If you use HubSpot's CMS, you'll find separate HTML boxes designed just for this occasion, as shown below.
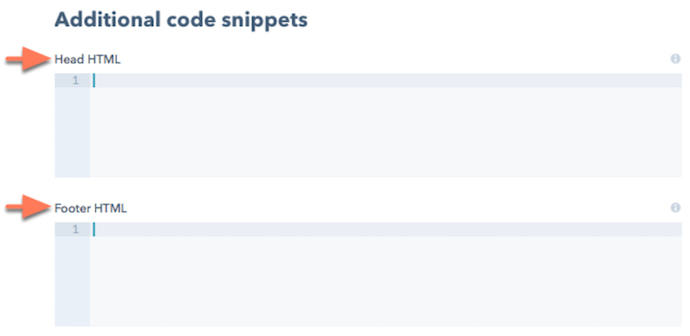 Learn more about adding HTML to webpages in HubSpot Academy.
Want another way to tag your HTML with various pieces of microdata? Review the different examples of rich snippets below this list of instructions. Each of these rich snippets link to separate Google instructions on how to optimize for each type of rich snippet. (When you load their page, always select the "microdata" approach to get the right instructions.)
6. Test your rich snippet.
Google Webmaster Tools has another nifty feature that lets you test your rich snippet. Click here to use their Structured Data Testing Tool. This will confirm whether or not Google can read your markup data and whether your rich snippets are appearing in their search results.
7. Be patient.
If you don't see your rich snippets in Google's search results right away, don't freak out. It actually takes Google as long as a few weeks to crawl and index this new data. So go to the beach. Sip a margarita. Soak in some sun.
Okay, it's more likely that you'll just keep working on other stuff in the meantime, but a girl can dream ...
Rich Snippets Examples
Let's run through some of the different types of rich snippets that are available to use on your website. Each section links to Google's instructions on how to actually install the rich snippets -- remember to select the microdata option for the easiest installation process!
Business and Organization Snippets
A rich snippet about a business or organization can include location information, contact information, price ranges, hours, and customer reviews, if there are any available.
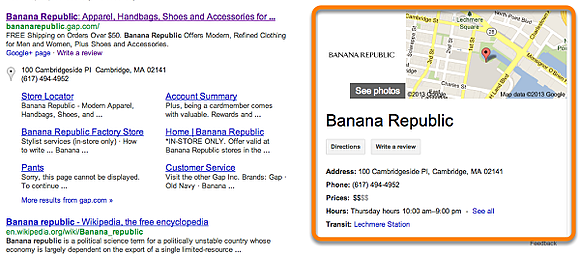
Learn how to create rich snippets for organizations >
Event Snippets
Event snippets include the date, location, and time of the event. If there are more than one option for the events, up to three will be displayed.

Learn how to create rich snippets for events >
Music Album Snippets
Using music album rich snippets will display links to individual songs in an album, or even lyrics to the song if available.
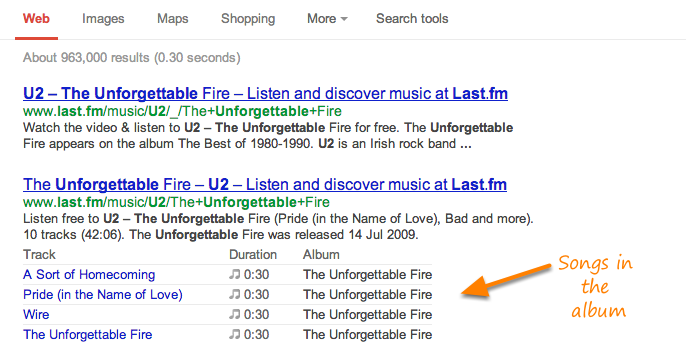
Learn how to create rich snippets for music >
People Snippets
The people snippet displays information such as a person's job title, the company they work for (a.k.a. affiliation), and location. It can also display a photo, nickname, and more.
People snippets are different than author snippets. Here is the difference, with an example of yours truly.
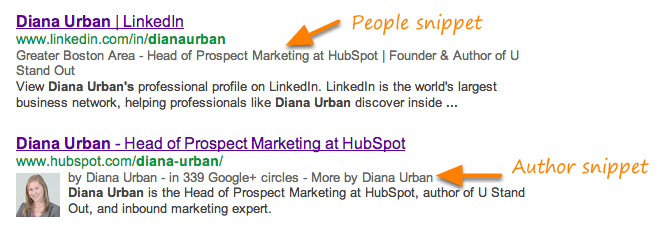
Learn how to create rich snippets for people >
Product Snippets
Product rich snippets include things like a picture of a product, ratings, and price range of the product.

Learn how to create rich snippets for products >
Recipe Snippets
Recipe rich snippets provide users with additional information about a specific cooking recipe, such as the ratings (1 to 5 stars), cook/prep time, and calorie information.
In order to qualify as a recipe, you must have at least two of the following tags in place:
- A photo of the dish
- The tag: prepTime, cookTime, totalTime, or ingredients
- Calories
- Review
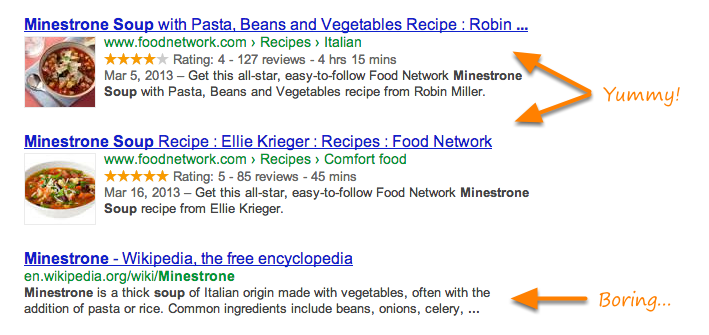
Review Snippets
You've already seen a bunch of examples of snippets that have 5-star ratings included. But you can also set up a snippet that is just the review portion.
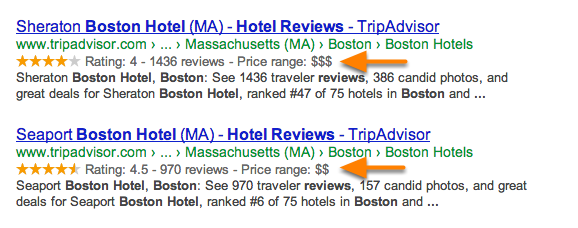
Learn how to create rich snippets for reviews >
Video Snippets
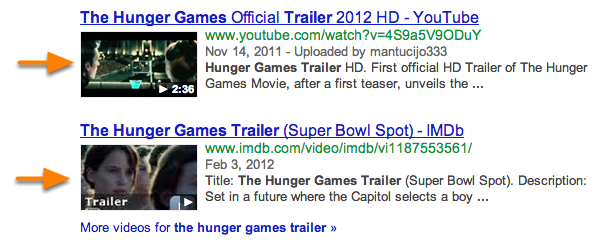
If you want a thumbnail of a video to display next to your search listing, the markup works a little different. Google recognizes the Facebook Share markup code, so you might as well kill two birds with one stone.
Learn how to create rich snippets for videos >
from Marketing https://ift.tt/2SOFmal


No comments:
Post a Comment